
Here’s the tutorial, in Eddie’s own words:
Figure Disassembly – torso pop/crack vise/pliers
So here’s part two of my basic figure disassembly. It’s more in-depth and not really as basic. It also involves tool(s) that not everyone will have, namely a vise. But fear not, I’ve also done a picture tutorial with pliers which I hope any guy that calls himself a man will have.
Anyway, I’ll show the pictures, and the text for them will follow with numbering that goes along with corresponding picture. Try and keep up.
Vise method
(click pic to enlarge)
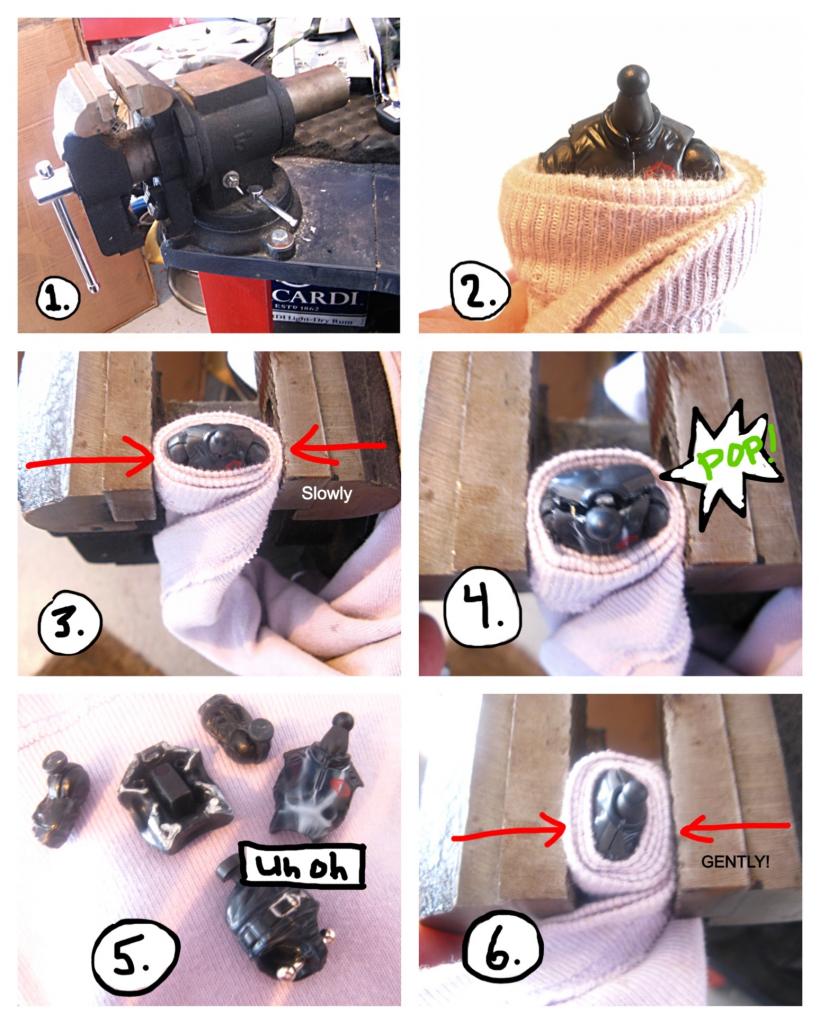
Step 1. The tool. A vise!. It doesn’t have to be as manly (and overcompensating) as mine. Any vise will do. But the bigger the vise, the easier (less muscle) this process will be.
Step 2. My vise has a rough texture on the jaw faces for gripping things put into it. I don’t want that texture transferred to my figure. So what you’ll have to do is wrap your figure in something protective. I’ve chosen a t-shirt. I always wrap it three layers thick (six if you count front and back layer of shirt) and have never had the jaw face texture transfer. Wrap it around the shoulders as this is where the jaw faces will press against. I try to keep the shirt low enough so I can see the figure and know for certain that it’s perfectly aligned in the vise and when it’s popped.
Step 3. Place wrapped figure into vise perfectly perpendicular to the jaw faces. Slowly tighten vise. If you can see that it’s slipping out of perfect perpendicular alignment, open the vise and readjust. Then slowly tighten vise. The amount of force/pressure required depends heavily on how much glue was used on each individual figure. Try to keep your fingers pinching the figure (pressure not needed) so you can, (1) tell when the figure has popped/cracked, and (2), to catch parts if they go flying. This occasionally does happen. In a messy garage or work area, it may be very difficult to find a shot out torso piece. Continue to tighten vise until…
Step 4. POP!! This is what you will most often times see once your figure has popped, but not always. Occasionally you will hear a sound like the figure has popped open, but the seam at the top will still be sealed. Unwrap your figure and check under the arms since the figure will sometimes only pop on the lower part of the torso. If this has happened, it’s usually very simple to pry apart with either your fingers or tool if necessary.
Step 5. UH OH! Your figure has stress marks! Now what?! Well, most likely you’re doing this torso pop to use on some kind of custom, so this kinda thing sometimes (but rarely) happens. It’s most noticeable on darker plastics. Maybe you’re going to paint the figure, so no big deal. Or maybe a vest goes over it. But lets say it is a big deal. There is another way to mostly remedy this.
Step 6. So you have stress marks. I’ve found the best way to get rid of them (most times) is to stick the wrapped figure back into the vise parallel to the jaw faves (chest and back against the faces). Then slowly tighten the vise closed again putting a bit of pressure on the figure. This most often times gets rid of stress marks. I personally do this everytime whether or not stress marks have happened as it also helps to undo any warping that’s happened making the figure loosen up. I’ve also heard (but never tried it) that taking your stress marked part(s) and placing them in front of a hot blowdryer will erase the stress marks.
Pliers method
(click pic to enlarge)
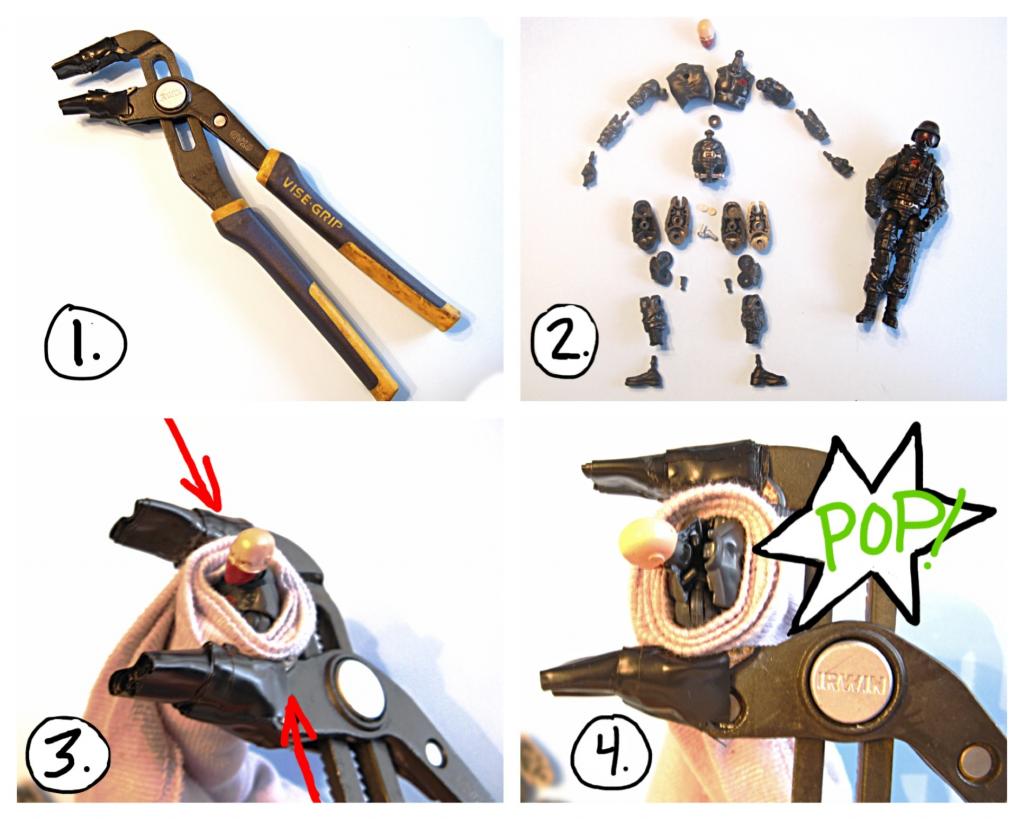
Step 1. The tool. Pliers! In this instance, you’ll definitely want manly as possible pliers since you’ll have to apply more force than using a vise. Though, like with the vise, the amount of force/pressure will vary. I’ve wrapped my pliers teeth with tape because the texture on them is pretty sharp. It concerned me that it might potentially poke through the shirt layers. I didn’t want to find out the hard way.
Step 2. More like “picture 2”. But anyway, this is what the figure will look like popped/cracked with either method and completely disassembled.
Step 3. Wrap figure the same way as step 2 of the vise method. Place wrapped figure into pliers with shoulders against jaw faces. Squeeze pliers until figure pops. Again paying attention to not let parts go a-fly’n.
Step 4. Um, popped figure. Again, like the vise method, the figure might not always pop at the top. It may pop under the arms.
* * * * *
We’d like to thank G.I. Eddie for sharing his techniques with us. His original thread is here, so feel free to have a look and join the discussion!


