
![]() We have a multitude of tutorials on the front page and the forums themselves, ranging from painting camo to wiring LEDs, but I think what we have here is quite possibly the most comprehensive and wide ranging painting tutorial to date, and it comes from forum member MIKED. I’m not going to say this is the end all, be all of painting tutorials, but in my opinion you certainly can’t go wrong following the techniques he uses, and explains in great detail so that even the most amateur of us should be able to follow his example.
We have a multitude of tutorials on the front page and the forums themselves, ranging from painting camo to wiring LEDs, but I think what we have here is quite possibly the most comprehensive and wide ranging painting tutorial to date, and it comes from forum member MIKED. I’m not going to say this is the end all, be all of painting tutorials, but in my opinion you certainly can’t go wrong following the techniques he uses, and explains in great detail so that even the most amateur of us should be able to follow his example.
“Hey All!
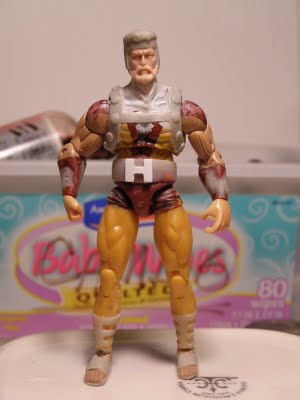
Welcome to my custom figure painting tutorial. Thank you for your interest. The subject of this tutorial is my new Marvel Universe Hercules custom. I decided to do the Lion of Olympus in his garb from his mid to late 80’s stint on the Avengers roster.
The part list are as follows:
His head is a modified Broken Arrow Toys head
His body is an MU Wolverine
His hands are from the Submariner
His Feet are From an Indiana Jones Ugha Warrior figure
The H on his belt is cut from thin sheet styrene
His Mace is cobbled together from parts of a Black Panther Katana and a Transformers Missile
The garish forward poised Wolverine neck was removed and replaced with a GI Joe Classics Zartan neck.
All of the sculpting was done with Aves Apoxy Sculpt and thoroughly sanded smooth after each application.
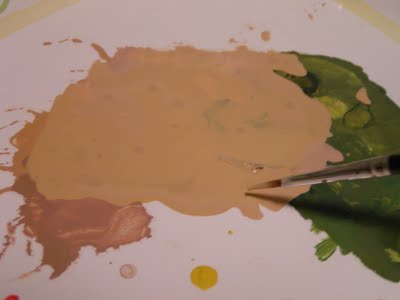
Now on to the painting. The largest portion of this figure is flesh tone so I mix up a big batch. This consists of 4 colors in this particular case and they are flat yellow, and 3 flesh tones: base tone, shade tone, and highlight tone. The flat yellow is Tamiya brand and the 3 flesh tones are Testor’s Model Masters. I mix the desired color on a plastic plate that serves as a great disposable palette and I thin it with water to the consistency of milk. This is vitally important as it is imperative to apply the paint in many thin, smooth coats until desired coverage is attained. If the paint is applied to thick it will cause brush strokes and in extreme cases clumping.
The best way that I can describe the process of painting with many thin coats is that rather than brushing on the paint it is necessary to float the paint on with the brush. Move it around gently and smooth out the puddles with the brush. When the first coat is dry you can begin to apply the second, third and so on. You should expect that at the right consistency it might take up to 6 or 8 coats to completely cover the figure. While this sounds like a tedious process, the results are worth the work. Take note of the picture in which the paint is being applied to the neck of the subject and note how thin it is.
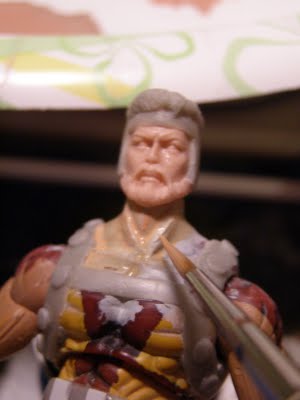
Then notice the photo of the dried first coat on the head, torso, and arms of the subject and take note of the thin wisp of coverage. This is what you should expect to achieve after one coat. Again, patience and persistence will produce the best possible results here. Be sure to continue to thin your paint with water as needed and be careful not to reactivate dried portions of the paint on the palette as this may cause you to apply clumps of dried paint to your subject that might not appear visible until the coat is dry.


