
1/18th Scale Mi-24 Hind Will Become A Reality !!!
- Thread starter Pickelhaube
- Start date
You are using an out of date browser. It may not display this or other websites correctly.
You should upgrade or use an alternative browser.
You should upgrade or use an alternative browser.
I think some of the kits shipped out? I haven't seen anything though I haven't really been digging. Just making sure Pickel isn't dead!
All of the kits have shipped out at least 6 months ago.
I think most guys are waiting for me to start on the full builds so they fallow along.
To my knowlege YT is the only guy who has fully built and painted his.
I think most guys are waiting for me to start on the full builds so they fallow along.
To my knowlege YT is the only guy who has fully built and painted his.
YT, post some pics so we can all bask in the glory of it! Would love to see the finished product.

*tap tap tap*
How's it coming Pickelhaube ?
December 1st 2019 will mark 5 years since this thread was opened!!
How's it coming Pickelhaube ?
December 1st 2019 will mark 5 years since this thread was opened!!
I actually have a real update.
I have taken a copy of the color schemes and went down and enlarged them to 1/18 scale.
Before I started the HIND I ordered a vacuform helo body in kinda 1/18 scale.
Originally I was going to use rubber sheeting to make the camo template but considering the nature of the rubber I feared that when I took it off the model it would smudge the paint.
So I figured that I would use the vac shell as a hard template .
After 4 days here is what I got and I am still not finished.
Hopefully I will have it and the boom done enough to do a trail paint .
pickelhaube said:Hmmm why is that UN Hind all blurry ?
Anyway the templates work perfectly .
I airbrushed some paint to check the edges and I am happy they way it tured out.
Nice and soft .
After I cut the temps I glued some rubber bands 1/8th inch tall and back from the edge.
Proof of concept.


")
Thanks John and NSA
Back set of temps came out great as well
It took me over 6 days of work !!
I hope that the time saved will be worth a weeks worth of work.


 [/quote]
Back set of temps came out great as well
It took me over 6 days of work !!
I hope that the time saved will be worth a weeks worth of work.
[/quote]Great googly moogly!
I always thought the doors on the side were like person height, I don't know why, I just always had that in my mind.
Turns out they're much smaller

Like a little hatch to run out of!
I always thought the doors on the side were like person height, I don't know why, I just always had that in my mind.
Turns out they're much smaller
Like a little hatch to run out of!
Seems like they were taller when Rambo shot the RPG thru them.Great googly moogly!
I always thought the doors on the side were like person height, I don't know why, I just always had that in my mind.
Turns out they're much smaller
Like a little hatch to run out of!
I've not seen it for quite a while, but it's possible that they used visually modded non-Hinds (like they did with Red Dawn). The reality is that personnel carrying aircraft/helos are made to be as small as possible (lower weight and harder to hit), and even moreso when they combine the role of gunship with troop carrier. And it's not just theirs. Trust me, it's hazardous simply to be tall and board an Osprey or Chinook without a helmet.
I've not seen it for quite a while, but it's possible that they used visually modded non-Hinds (like they did with Red Dawn). The reality is that personnel carrying aircraft/helos are made to be as small as possible (lower weight and harder to hit), and even moreso when they combine the role of gunship with troop carrier. And it's not just theirs. Trust me, it's hazardous simply to be tall and board an Osprey or Chinook without a helmet.
Destroying my childhood one fact at a time. The first time I knew enough to pick out a movie fake was Private Ryan’s T-34 Tiger, not counting the obvious Top Gun Migs.
[BGCOLOR=transparent]Turns out Robert shoots thru the doors not Rambo:[/BGCOLOR]
[BGCOLOR=transparent]Rambo 2 & 3 is not the same bird as the Red Dawn one above and get added points for the machine gun rocket pods. [/BGCOLOR]
I had no idea about the Tiger in Saving Private Ryan.. even looking at it now I guess I can kinda see it, but I was never a rivet counter so it didn't stand out to me.
I knew about the "Hinds" in Red Dawn and Rambo.. both are Pumas I guess, though it feels like they did more/better vismod work on the one in Red Dawn.
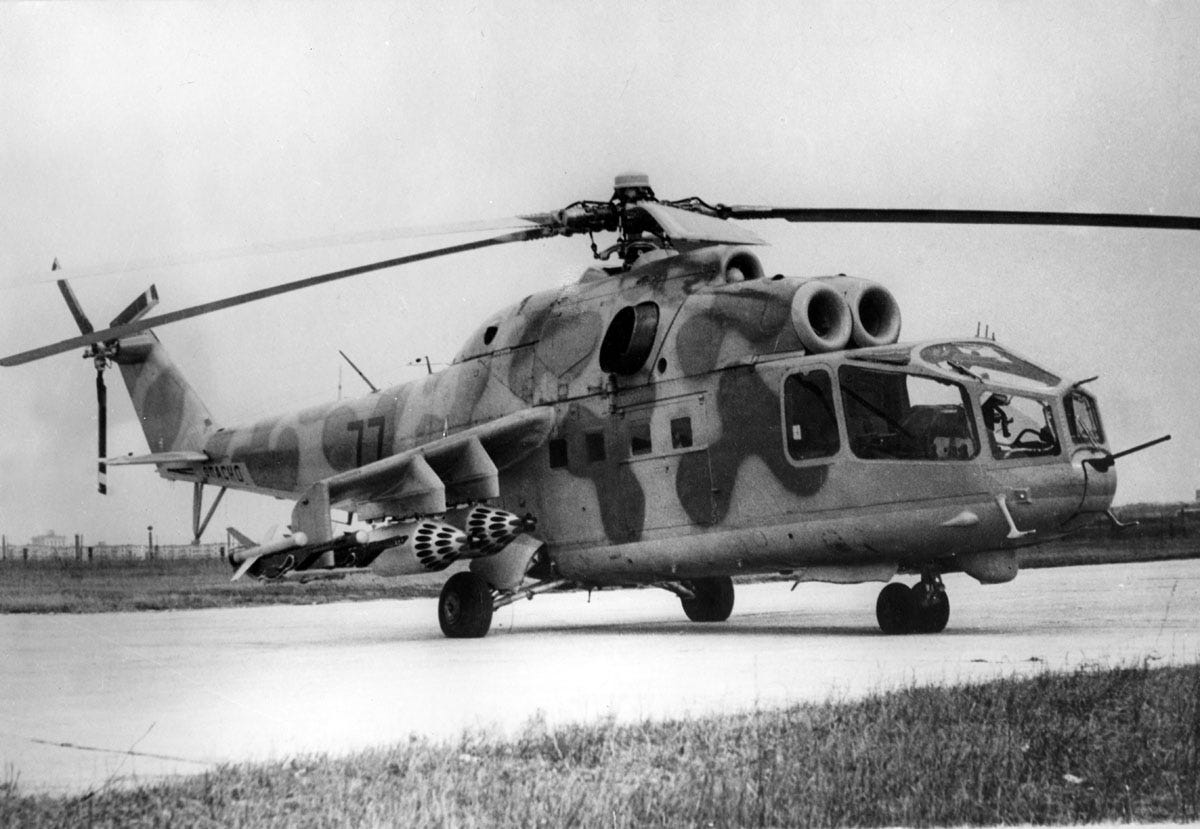
Still can't believe the Hind looked like this originally:
The Pumas, especially in Red Dawn, do a good job of conveying this look. Especially compared to the normal look we know and love. As a kid though, I guess I just kind of thought they were all the same, we didn't have Google to image search it!
I laughed how a RPG-7 just kind of annoys the Hind in Red Dawn, but a LAW straight up exploderates the Hind in Rambo.
I knew about the "Hinds" in Red Dawn and Rambo.. both are Pumas I guess, though it feels like they did more/better vismod work on the one in Red Dawn.
Still can't believe the Hind looked like this originally:
The Pumas, especially in Red Dawn, do a good job of conveying this look. Especially compared to the normal look we know and love. As a kid though, I guess I just kind of thought they were all the same, we didn't have Google to image search it!
I laughed how a RPG-7 just kind of annoys the Hind in Red Dawn, but a LAW straight up exploderates the Hind in Rambo.
That's 'cause Robert pretty much just shot the door gunner/crew chief with the RPG and Rambo shot the pilot right in the face (which of course ignites all fuel and weapons aboard)  ... I sure hope those POWs exited the Huey before he shot that LAW or they likely got a nice sunburn out of it as well.
It most definitely sucks to have even a little roto/aircraft recognition and watch movies, particularly from back then.
... I sure hope those POWs exited the Huey before he shot that LAW or they likely got a nice sunburn out of it as well. It most definitely sucks to have even a little roto/aircraft recognition and watch movies, particularly from back then.
I am working on them every possible chance I get
Hopefully the first 2 sales will be done by Christmas
Those guys have been waiting the longest.
Here are the pilot ans WSO paint masters.


Last edited:
Not sure were my helpful hints went to but progress is being made
Postby pickelhaube » Sat Dec 21, 2019 6:35 am
I am doing my best to get the first 2 out but there are road bumps every ware.
I have been trying to button them up for final painting but EVERYTHING ELSE NEED TO BE BUILT AND PAINTED BEFOR THAT HAPPENS .
1. The main floor of the cockpit needs to be nipped and tucked to fit the front of the fuse. Go slow doing this.
The cockpit must be fully painted and built except the WSO gizmo in the very front and the 2 parts of the starboard side that goes against the wall.
These can be added later.
You must fit the nose gear and door prior to install.
2. The crew cab needs to be finished dry fit and the seat can be added through the top just before seal the fuse halves.
Do the floor first sliding it forward as far as it will go, Once fitted take it out .
Then fit the rear wall make sure it fits tight up against the ceiling rails.
Once done take it out fit the floor then fit the back wall.
Once floor is fitted fit the front wall on top of the floor.
Making sure your interior is painted at this time secure the windows and crew doors.
3. Dry fit the main gear and drill holes so they can be added.
4.Dry fit the wing lets. There will be some nipping and tuck to get these to fit tight.
The easiest way to fit the wings the same is place the fuse halves on a flat surface holding the wing in tight .
Then use a square against the belly of the fuse measure from the blade of the square to the drop down missile stub.
Make sure both sides measure the same then glue.
5. Before you final fit the wings the rocket rails should be fitted.
They probably should be fixed onto the wings and painted before final assembly .
Because you will have to deal with a 48 inch long fuse and taping and painting will be a challange.
6. Attach the main rotor hub .
I fitted everything together and once done I super glued the nut on the bottom of the mounts block.
In hindsight I should have molded an all thread in it and casted a nut in the rotor cap so that could be screwed on.
7. Once you think that you have everything squared away try and screw the fuse halves together. If you can leave the screws in and putty over.
Try to fit the tail boom may split the halves.
Once done and you think you are good to go, flow super thin glue to cement the halves together .
Of course being careful.
8. Glue the boom halves together putty sand and finish prep before paint.
After pouring the boom the stabilizer ( stabs) holes were off.
The boom should be epoxied together to the fuse using 1/2 hour epoxy.
Eye ball down the fuse to align the boom .Then allow to set rock hard .
Drill holes out for stabs .
Slide a dowl in the holes about 8-10 inches long and check alignment that way top and sides.
I tried this with the boom unglued from fuse and it was off , so I had to redo it .

Hey Guys ,
I have worked on the first 2 HINDS over the holidays
Every time I think I am ready to seal up the main fuse I realize I need to do one more thing before I do .
That was about 5 things ago.
Presently I am working on the cargo doors.
I am dealing with the hinges, mountings and door linkages.
Both of these builds , the guys want the turtle decks fixed so I have to mount the windows before I seal them up.
That means when I start paint I will have to mask them off .
When mounting the crew doors I noticed that there was a slight gap between the top and middle of the doors.
I glued a strip of .75 X 3 MM inside of the fuse on the top of widow rail( fuselage) and on the bottom of the top door closing off the middle gap.
That way when I start the painting process paint will not spray into the cargo compartment.
On the 3rd full build , I will start picture taking and will do my best on keeping track of time during the build d.
I am trying to build 2 at a time but that is not going smoothly.
After these 2 builds I will build on at a time .
Hopefully things will go smoother.
Hopefully as you get more experience with them they'll go faster and faster. How many total full-buildings + paint do you need to do?
Hopefully 2020 is the year of the HIND!
Hopefully 2020 is the year of the HIND!
Well I am finally getting paint on #1 in the Afghan livery .
You basicly have to finish all of the interior before you seal up the fuselage halves .
I inserted a steel rod through the entire length and built a platform so I can paint this beast. IT IS 4 FEET LONG.
I had to reconfigure my paint booth, now it is 60 inched wide with 4 blowers !!!
I am a big fan of pre shading and I fully painted the wings from pre shade to blue to alumnimum for the rocket rails.
It will be near impossible to paint them once they are attached.
My painting template work well but I have a fair amount of touch up that I need to do.


https://photos.smugmug.com/HIND/i-fqqBwSg/0/7d
[url=https://matthewhiggins.smugmug.com/HIND/i-LK4FmXh/A] [/URL]
[URL='https://matthewhiggins.smugmug.com/HIND/i-67CDJQj/A']


 [/URL]
You basicly have to finish all of the interior before you seal up the fuselage halves .
I inserted a steel rod through the entire length and built a platform so I can paint this beast. IT IS 4 FEET LONG.
I had to reconfigure my paint booth, now it is 60 inched wide with 4 blowers !!!
I am a big fan of pre shading and I fully painted the wings from pre shade to blue to alumnimum for the rocket rails.
It will be near impossible to paint them once they are attached.
My painting template work well but I have a fair amount of touch up that I need to do.
https://photos.smugmug.com/HIND/i-fqqBwSg/0/7d
[url=https://matthewhiggins.smugmug.com/HIND/i-LK4FmXh/A]
[/URL][URL='https://matthewhiggins.smugmug.com/HIND/i-67CDJQj/A']
[/URL]
Last edited:
Cool story on the hind snatch.
I have the paint scheme all tweeked out with panel lines inked in.
I have the paint scheme all tweeked out with panel lines inked in.


Thanks Guys,
So far it has taken about 3 days to paint the paint master .
I am short on decals and my supplier said he can not make anymore so I used stencils for the stars and tail flash.
I always intended to use stencils for the numbers and I supplied the number stencils in the kits .
The stars were pretty ease to paint .
I had my stencil maker make a blank star that I painted the base white of the star.
Once that dried , I applied another stencil on top of the white star and shot on the red.
The tail flash worked the same but that was closer to a nightmare to do .


[/quote]
So far it has taken about 3 days to paint the paint master .
I am short on decals and my supplier said he can not make anymore so I used stencils for the stars and tail flash.
I always intended to use stencils for the numbers and I supplied the number stencils in the kits .
The stars were pretty ease to paint .
I had my stencil maker make a blank star that I painted the base white of the star.
Once that dried , I applied another stencil on top of the white star and shot on the red.
The tail flash worked the same but that was closer to a nightmare to do .
[/quote]