
I'd been meaning to do this for a long while now, and a recent PM inquiry from DarthDre reminded me.
Anyway, here's a quick way to add rain to your photos, like this:
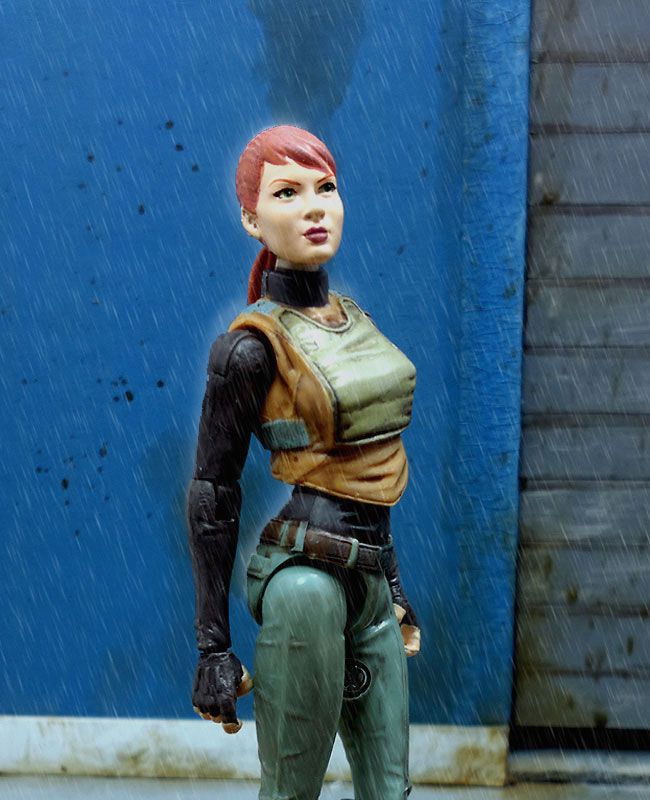
Honestly, taking screengrabs and describing the steps took much longer than making the above image.
I used Photoshop 7, but the technique is simple enough to work in earlier versions.
Anyway, here goes...
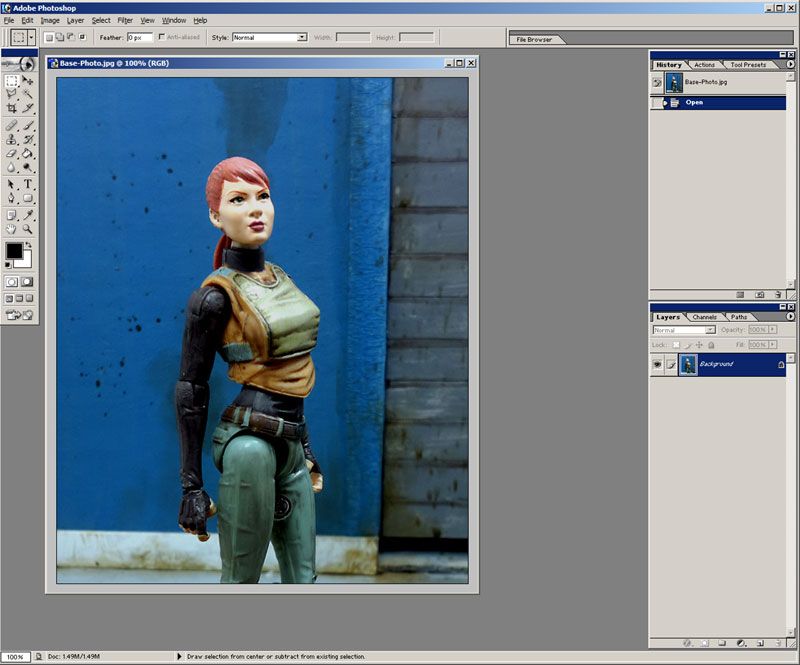
1.) Open your base pic in Photoshop (durrr...)
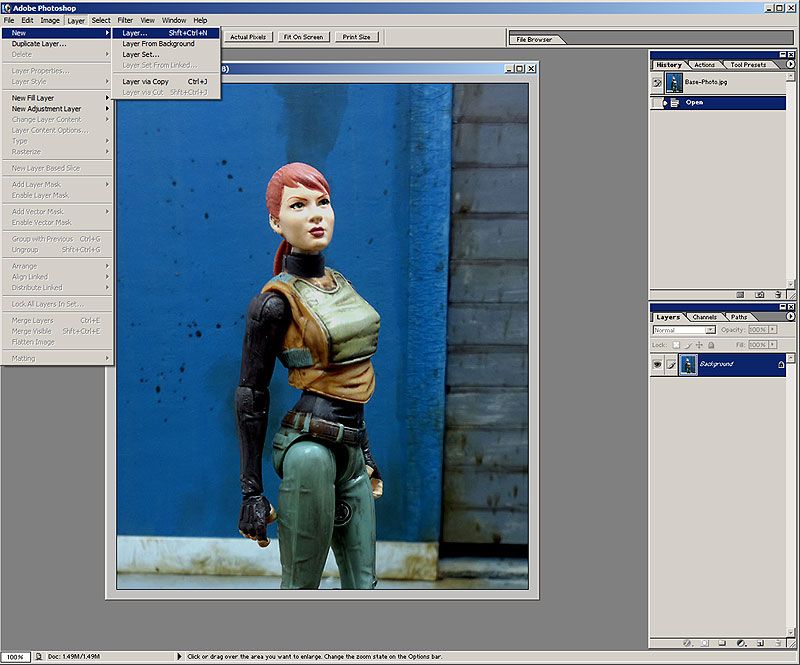
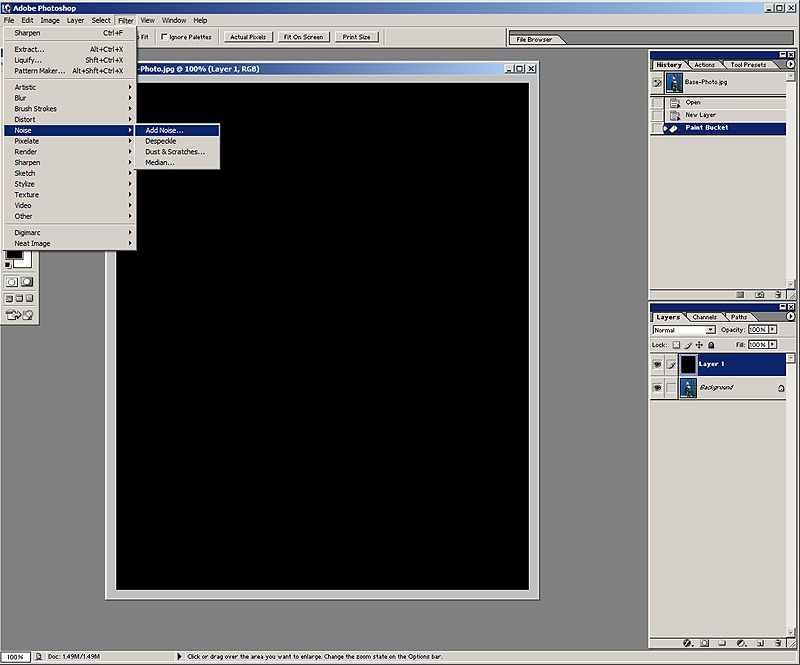
2.) Create a new layer with Shift+Ctrl+N. You can name the layer anything you want.
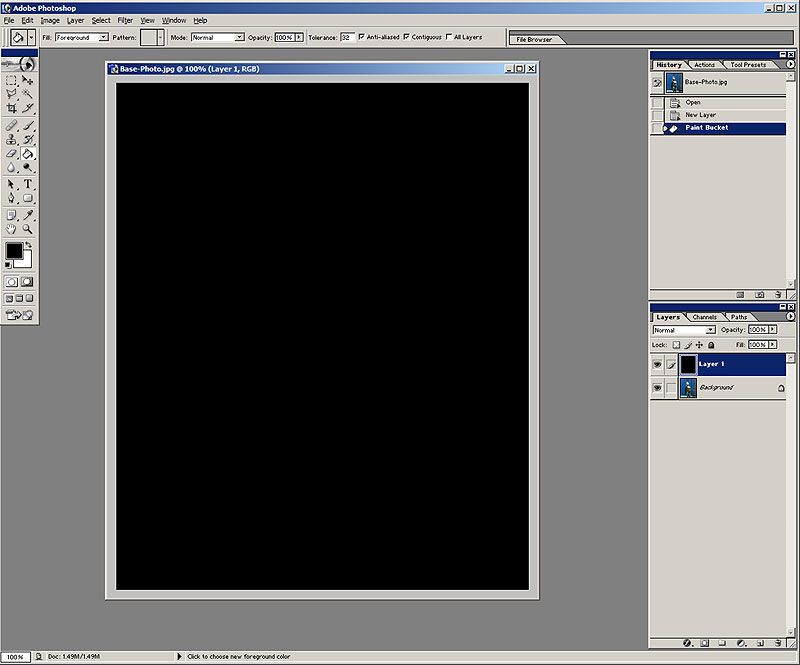
3.) Fill the new layer with black, using the Paint Bucket tool in the left-hand menu.
4.) On the top menus, click Filter>Noise>Add Noise.
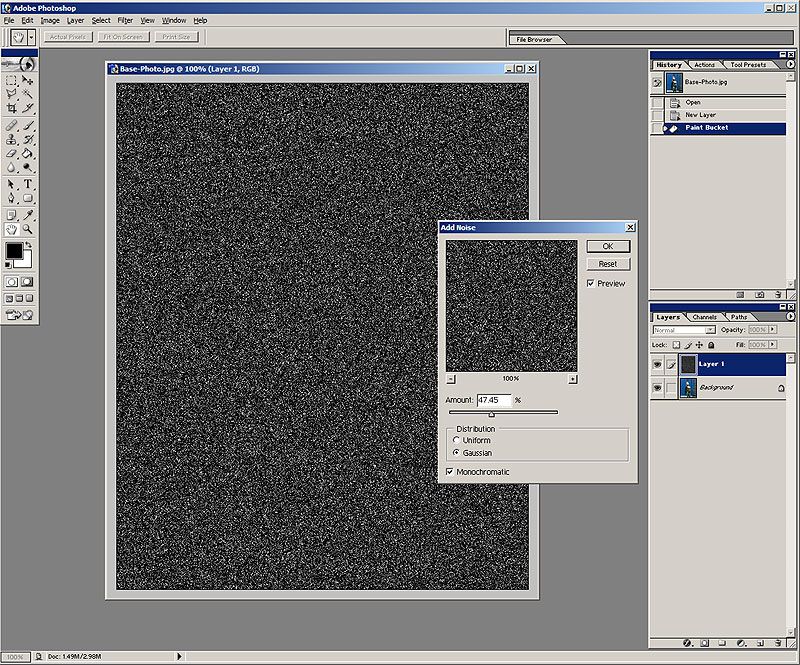
5.) This brings up the Noise pane. Adjust the slider between 40-50% noise. Make sure the "Gaussian" and "Monochromatic" boxes are selected. Hit OK when you're satisfied.
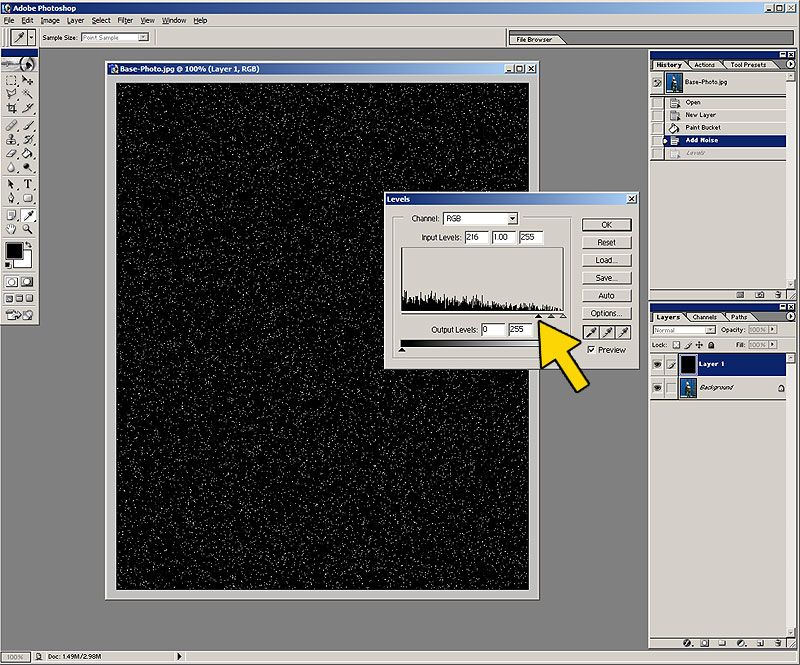
6.) Back to the top menus. Go to Image>Adjustments>Levels to bring up the Levels pane. Move the left-most slider (yellow arrow) over to the right, to reduce the number of white pixels. How much is up to you.
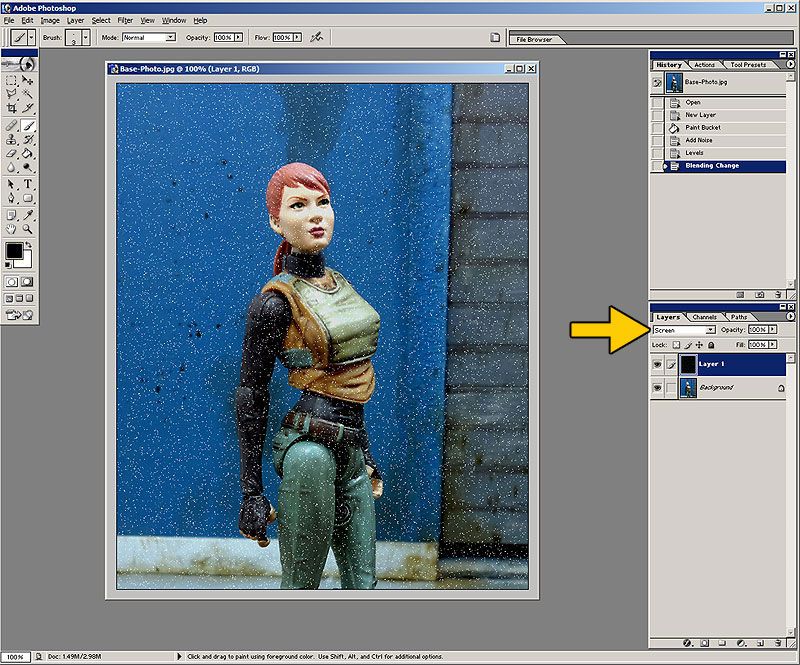
7.) In the Layer Options drop-down menu, select "Screen". This makes the black invisible.
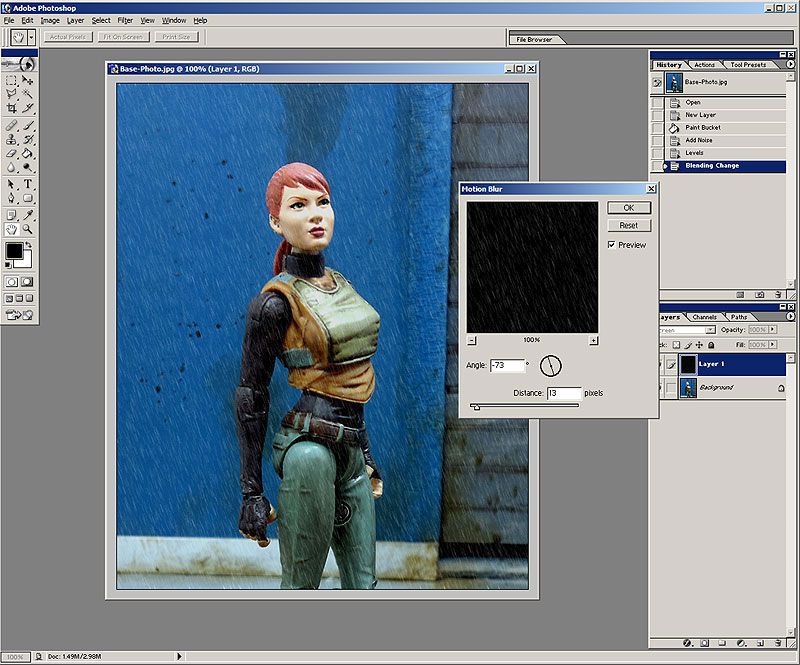
8.) Now to introduce movement to your rain layer. In the top menu, go to Filter>Blur>Motion Blur.
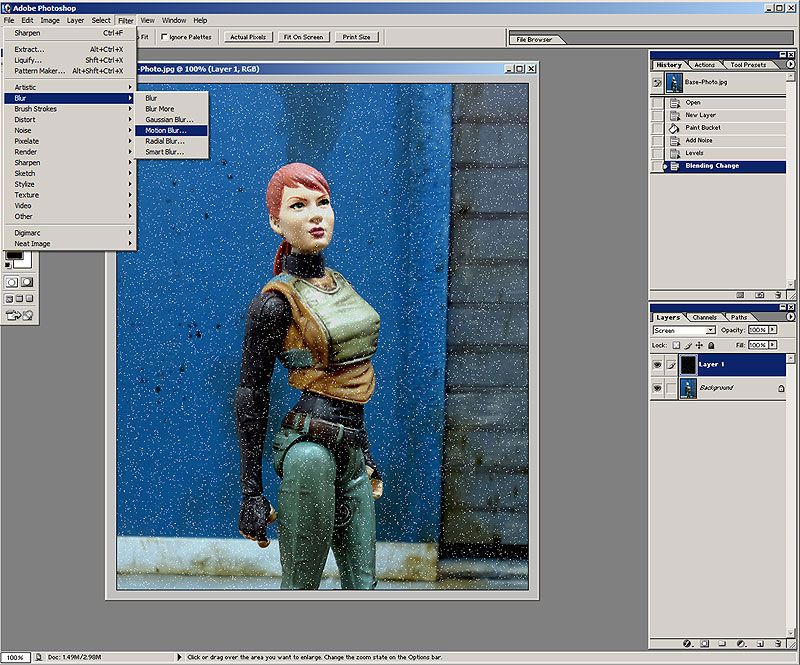
9.) With the Motion Blur pane you can use the dial to change the angle of movement, and the slider to adjust the amount of blur.
A light shower would need a steeper angle and less blur, while a driving rainstorm would need a shallower angle and more blur. Experiment!
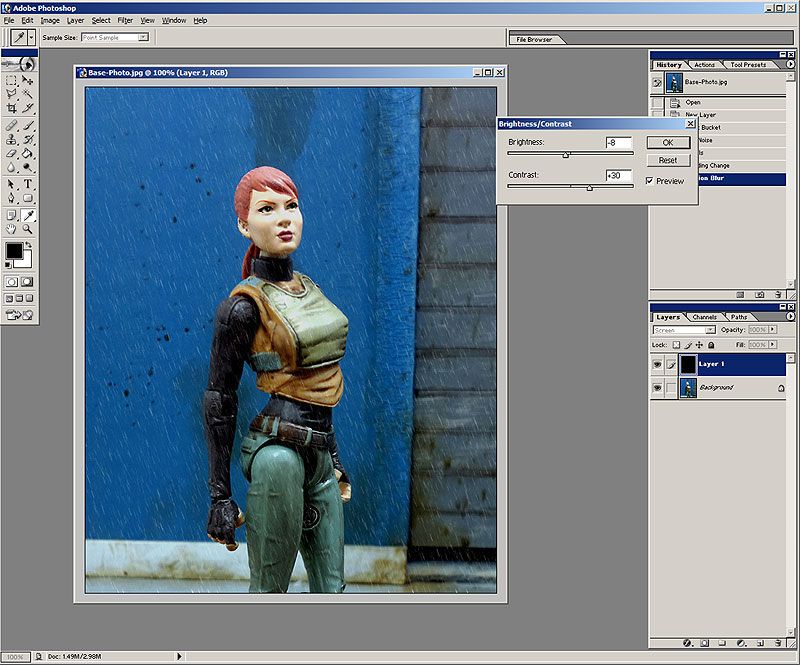
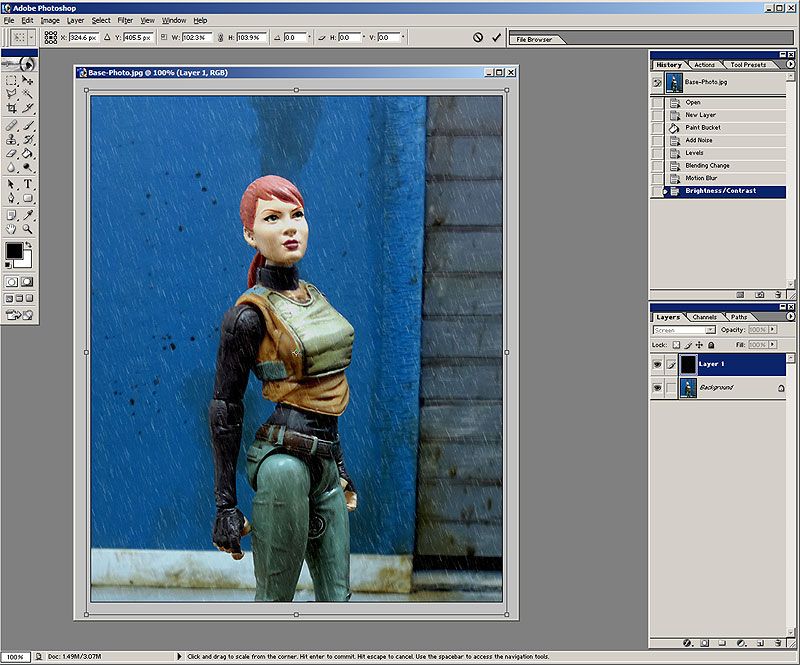
10.) To make the raindrops more visible, go to Image>Adjustments>Brightness/Contrast. Increase the Contrast and decrease the Brightness to taste.
11.) The Motion Blur filter doesn't play well with edges, so you'll need to go to Edit>Transform>Scale to manually enlarge the Rain layer.
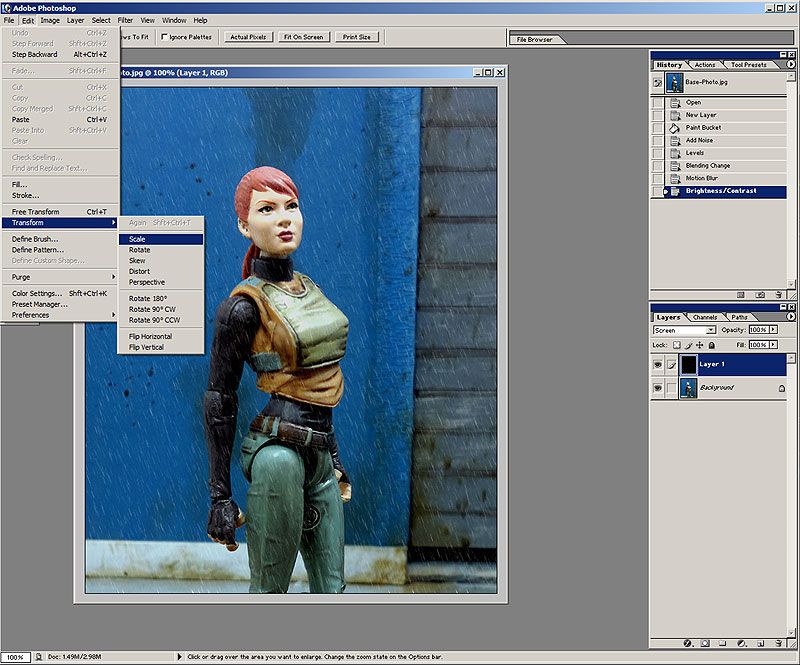
12.) A bounding box appears around the layer, and you can drag the corners out to resize it. Hold down Shift while dragging if you want to retain the aspect ratio. You can also reposition the layer by clicking and dragging.
When you're happy with it, hit Enter to apply the transformation.
If you still need to reposition the layer after applying, use Ctrl-drag.
13.) And we're done! I'll let you figure out how to add the "splash halo" where the rain hits the figure. Like this whole tute, it's a lot easier than it looks. Consider it a homework assignment.
Anyway, here's a quick way to add rain to your photos, like this:
Honestly, taking screengrabs and describing the steps took much longer than making the above image.
I used Photoshop 7, but the technique is simple enough to work in earlier versions.
Anyway, here goes...
1.) Open your base pic in Photoshop (durrr...)
2.) Create a new layer with Shift+Ctrl+N. You can name the layer anything you want.
3.) Fill the new layer with black, using the Paint Bucket tool in the left-hand menu.
4.) On the top menus, click Filter>Noise>Add Noise.
5.) This brings up the Noise pane. Adjust the slider between 40-50% noise. Make sure the "Gaussian" and "Monochromatic" boxes are selected. Hit OK when you're satisfied.
6.) Back to the top menus. Go to Image>Adjustments>Levels to bring up the Levels pane. Move the left-most slider (yellow arrow) over to the right, to reduce the number of white pixels. How much is up to you.
7.) In the Layer Options drop-down menu, select "Screen". This makes the black invisible.
8.) Now to introduce movement to your rain layer. In the top menu, go to Filter>Blur>Motion Blur.
9.) With the Motion Blur pane you can use the dial to change the angle of movement, and the slider to adjust the amount of blur.
A light shower would need a steeper angle and less blur, while a driving rainstorm would need a shallower angle and more blur. Experiment!
10.) To make the raindrops more visible, go to Image>Adjustments>Brightness/Contrast. Increase the Contrast and decrease the Brightness to taste.
11.) The Motion Blur filter doesn't play well with edges, so you'll need to go to Edit>Transform>Scale to manually enlarge the Rain layer.
12.) A bounding box appears around the layer, and you can drag the corners out to resize it. Hold down Shift while dragging if you want to retain the aspect ratio. You can also reposition the layer by clicking and dragging.
When you're happy with it, hit Enter to apply the transformation.
If you still need to reposition the layer after applying, use Ctrl-drag.
13.) And we're done! I'll let you figure out how to add the "splash halo" where the rain hits the figure. Like this whole tute, it's a lot easier than it looks. Consider it a homework assignment.
")