USS Flagg Carrier Carrier Strike Group project

Videoviper

illuminati
Officer Club
Aug 15, 2012
6,349
698
113
Behind a camera watching you!
Great stuff.

Its a post like this that makes you think, if GI Joe were a real unit how big it would actually be. For every 1 figure (aka specialist) there would be at least 10 - 20 doing the same job. More in the case of sailors & other crew.

Would love to see a wide shot with all the boats & crew. (Epic dio)
 

Joerhyno

Enlisted
Aug 18, 2012
890
0
0
How do you do the injected plastic elbows and shoulders? Are the pegs just cut when cast?
 

Jedi_Master_Ben

Enlisted
Mar 6, 2012
49
3
8
51
Thanks guys for the feedback and comments. It means a lot. Let me get some of the questions out of the way.

The idea here is to have this project wrapped up in time for the next JoeCon that comes thru Atlanta again. But I do want to set up this massive dio with the carrier, the submarine and support destroyers and the patrol boat in formation. I figure it would take 4x 8ft tables to set up, but it would be an epic sight for the show. If JoeCon does not ever come back in the next 2 years, then I will set up for Atlanta's own Joe Con. I even found a table cloth pattern that is ocean waves that the ships can sit on.

Thanks for the link Slaymaker, I will put in an order when I get back from my trip.

Joerhyno: "How do you do the injected plastic elbows and shoulders? Are the pegs just cut when cast?"

Answer: The best way I can do it is break down the figure except for the lower torso, I mold all that as one part. It reduces the torso articulation to a swivil movement, but I don't much articulation from the torso and I don't have to mold and cast the guts seperate. I then remove the hinge joints from the donor figure limbs by carefully cutting the pin in half and release the hinge from the joints. Then I mold everything, in doing so, I carefully cut the negative silicon space in the joints when removing the oringal parts. The molds don't last as long as a simple head mold. I ran the molds to get the desired number of figure parts I need before they get too far gone (when pieces of silicon get ripped away from the mold during part removal). Sometimes I have to dremel out the negative space that is formed when the molds start going bad, but its not that bad. Wishfull thinking would be to call up Hasbro ask them to let me make X amount of parts from the factory in the colors I need and then assemble the figures here, but that's not going to happen.

Next up is putting together the CPO and another male officer in khaki uniform. That should wrap up all non deck crew for the Flagg. I will start casting more female deck crew when I get back from my trip. Also I want to start working on the next phase of the Flagg: raising the water line on the ship. I want to raise her an additional 6 more inches above sea level. I cam across an image of a custom that some one was doing, something simular to what I had in mind. See image below:


(Just to be clear, this is not my USS Flagg, just an image I found during some research)

The only differnence from this version is that I only want to do one level at 6 or 8 inches high. That should be the right hight for the Flagg sea level based on images of real carriers. Plus it will open another level to the playset to include things like an engine room, medical center, CIC, ect.

Thanks again for the support everyone, stay tuned for more updates.
 

Attachments

  • uss flagg custom hull.jpg
    uss flagg custom hull.jpg
    95.6 KB · Views: 212
Last edited:

Meddatron

I am what I am
Apr 19, 2011
11,383
5
0
49
York, Pa
s1193.photobucket.com
Man, Casting the whole lower torso is brilliant. No need to sacrifice figures or cast the hip ball joints. Outstanding tidbit of info. When/if I cast an entire figure. I am going this route. Much appreciated!
 
Last edited:

Jedi_Master_Ben

Enlisted
Mar 6, 2012
49
3
8
51
Man, Casting the whole lower torso is brilliant. No need to sacrifice figures or cast the hip ball joints. Outstanding tidbit of info. When/if I cast an entire figure. I am going this route. Much appreciated!

Yeah, I just started doing that for this project, I did not see the need to break it down any further as I do not plan to move the figures much once they are in thier final pose. Since no one is offering metal T-bars (in the correct size and all) platic T-bars has been the way to go for static type of figures making. If the figures are ment to be played with kids, then I would look at finding metal T-bars in order to withstand the constant play on the legs. Just make sure to possition the top joint to the desired possition (test fit the two halves so that the upper torso is not slopped too forward) prior to molding. One thing to keep in mind, if for some reason one or both balls break at the stem of the crotch area, you can fix this by drilling a small hole in the stem and the crotch and insert a metal wire (the type you find in florist section in craft and hobby shops) this adds strength and stability to the mechanical bond you make when gluing part(s) back on. Superglue is not enough hold on its own from my past experience.

This can be carried over to the elbow, ankle and shoulder joints too. It happens from time to time that the stem gets caught while turning the arm or foot and it snaps. Instead of casting a new part, you use this metal pin method and can save the hinge joint (most of the time). I thought I would throw that nuget of info to you guys.
 
Last edited:

Joerhyno

Enlisted
Aug 18, 2012
890
0
0
One idea I had was kind of like you are doing but modding the lower torso so it has a big ball joint on the top, then you mod the upper torso to pop on the lower torso and also mod the shoulder pins to be more of a point boil and pop kind of pin(think star wars shoulder joint pins that plug into the shoulders, or how the elbow arm pins are). When it's all said and done, you can cast the upper torso as one(in a softer plastic) and then pop it on the lower torso and pop the arms in at the shoulder. May be a lot of work pre-casting, but might make for some better movement wise when it comes to posing them.

The best example I have for a picture is to mod the Joe torso parts so they're like this one:


Jedi_Master_Ben

Enlisted
Mar 6, 2012
49
3
8
51
Quick update:

- USS Destroyer

Just got back from visiting the store I order my molding and casting supplies from and they were able to give me some tips and list of supplies that will move this part of the project forward. I was on the right path as far as molding the hull of the destroyer. The plan is to use a version of silicon rubber that I can brush on and have it cure in 10 to 15 minutes. I would need to put apply multiple layers of this rubber silicon in order to give it a thick wall. To support the silicon mold, I will need to make a 2 part shell (aka Mother Mold) using Smooth-on Plasti-Paste II. Once I have a mold of the hull, I can make a cast by using Smooth-on Smooth-Cast 65D by rotational casting process. So here is the game plan for this:

- Make a mock up of the ship with foam board materials. This will include final shape and size of the ship that I plan to make.

- Build a new bottom to the current destroyer toy by using clay to increase the hull height by 4 inches.

- Extend the length of the ship with clay by an additional 12 inches to create a new helicopter pad/ stern.

- Once new hull is sculpted, make a mold and cast the hull


From there, will create a new deck and new superstructure for the ship, in short, nothing from the original toy will be cut up to make the destroyer toy, it will be almost scratch built. But if all goes well, I not only will I be able to make duplicate ships for the fleet, I could make this a kit to sell on e-bay or something.


- USS Tiger Shark

OK, this past week, we have been introduced to Chap Mei latest offerings, a Joe scale Submarine. It's just over 2ft long and has compartments for figures to interact with the vehicle. Needless to say, it gave me a lot of ideas for the Tiger Shark sub. As you have seen from the pics of the USS Tiger Shark, the play access is on the side of the boat where as the Chap Mei version is on the top (similar to the C-130 toy). So I am at the cross roads with this one, I need your opinion on this.

- Should I continue with gutting the side compartments and install the play features and maintaining the side access of its current state?

- Mold and cast a new shell of the Tiger Shark (similar to how I will be doing to the destroyer hull) and model the access areas to that of the Chap Mei version. This option would open other design changes to the boat by allowing me to extend the sub to 4ft long, put on a different propeller, ect.

What do you think?

OK, that's a wrap for tonight. I will be back after the trip with new pictures. Thanks for your support and stay tuned for more updates.
 

Meddatron

I am what I am
Apr 19, 2011
11,383
5
0
49
York, Pa
s1193.photobucket.com
That's a tough question considering I am not that well versed on any water vehicle.

The questions that pop into my mind when thinking of your decision would be.

How close to real scale are you trying to be? Your work so far seems to be very accurate. So which is closer to scale if going scale? 2 feet or 4?

The other thing I thought about is the Flagg is playable from the side. Are you keeping it that way? For a huge display purpose I would think having the interiors being visible from the side would work best. One side view is all accurate exteriors, other side is the interiors.

Sorry couldn't answer your question with any real answer. But those are the thoughts that popped into my head while reading.
 

G.I.*EDDIE

gobbles a LOT of cock
Founder
Mar 14, 2011
43,432
428
83
S.E. Mich :(
"- Should I continue with gutting the side compartments and install the play features and maintaining the side access of its current state?"

Will the feature(s) be utilized?...if not, I wouldn't bother
 

Jedi_Master_Ben

Enlisted
Mar 6, 2012
49
3
8
51
That's a tough question considering I am not that well versed on any water vehicle.

The questions that pop into my mind when thinking of your decision would be.

How close to real scale are you trying to be? Your work so far seems to be very accurate. So which is closer to scale if going scale? 2 feet or 4?

The other thing I thought about is the Flagg is playable from the side. Are you keeping it that way? For a huge display purpose I would think having the interiors being visible from the side would work best. One side view is all accurate exteriors, other side is the interiors.

Sorry couldn't answer your question with any real answer. But those are the thoughts that popped into my head while reading.


Thanks guys for the input. Looking at the current toy image:


Access to the toy play features from the side and comparing that with the Flagg helps to tie the toys features together, almost like it was meant to be done on purpose. It also gives the look of the cut away model kits. It helps put some perspective to this decision. Also this will apply to the destroyer construction as well.

On a side note, I got to meet a representative from smooth-on at the con today and address the issue of making hidden joints for our figures using smooth-on products. He gave me his card and told me to contact him later as they just hired on someone from Tod McFarland Toys who specialized in joints construction. Cross your fingers guy for if this works out, we may have away to make full cast figure kits doable.

I am so excited coming out of this Con and can't wait to get back to work on this project. Stay tuned for more updates.
 
Last edited:

Jedi_Master_Ben

Enlisted
Mar 6, 2012
49
3
8
51
Just a quick update.

I sketched out the potential size of the new USS Destroyer build. Here is the sketch with a couple of props to show scale:


I raised the old USS Destroyer's hull by 2 inches and extended her length by an additional 12 inches to her a total of 4 ft long. With the Shipwreck figure, I eyeballed the placement of the island and figured the height. By placing the Sky Hawk on the landing pad, I see I have a little extra space so I can make the bridge section deeper by shifting other parts of the islands back. For the first rough sketch, she did not turn out as bad. At this point, I can make a foam board model of the ship before any modifications or molding is started. I do plan on making a CIWS, the mast and other details as the project progresses. I did put the drawing next to the Flagg and with the Flagg having an additional 3.5 ft on this, the ship fits with in scale (as Joe vehicles go).

Let me know what you all think.

As always, stay tuned for more updates.
 

Attachments

  • USS Destroyer mock up 1.jpg
    USS Destroyer mock up 1.jpg
    51.1 KB · Views: 151
Last edited:

Meddatron

I am what I am
Apr 19, 2011
11,383
5
0
49
York, Pa
s1193.photobucket.com
Yeah that's gonna rock. Plenty of size and your getting a Skyhawk in there to boot. The Flagg with a few of these bad boys by it would be hands down one of the coolest dios!


Ha! Going back to your battleship comment, could you imagine using your ships on a giant Battleship gameboard dio in the middle of a con. fully loaded with your crews and everything! Holy heck, that would be the dio display of all time!
 

Jedi_Master_Ben

Enlisted
Mar 6, 2012
49
3
8
51
Thanks guys for the comments.

Here is another quick update:

I went home during my lunchbreake and after looking at the picture I posted last night and had an idea, kind of an oversight if you may. Since this destroyer project is supposed to be a guided missile destroyer, I needed to place missiles on her. For starters, the missiles from the Flagg are a perfect size for the destroyer. At the bow section I was thinking a matrix of 2x3 for a total of 6. In the stern section of the boat, I was thinking 3x3 for a total of 9 missiles for a grand total of 15 missiles load. As I said before, after placing the Sky Hawk at the stern landing pad, I had some excess space which allowed me to rearrange the islands. I started by redefinding the stern landing pad so that it fit the Sky Hawk with a little bit of spacing between the ship and the aircraft. From there, I cut the hull piece from the paper and taped it down on the table. I then cut out the aft smoke stack section from the paper drawing and taped it down in its new position. I did the same for the bridge piece as well. I then cut the bridge from top to bottom away from the rest of the island and the section with the CIWS platform next to the bow missiles and then placed the rest of the island close to the aft smokestack like in the originial drawing. I then traced out blank section left behind onto another piece of paper and cut it out and taped it in. Now the bridge is deeper and can fit control stations and helm station. Now the ship's profile is finished, I started planning out functions for each section of the islands. The radio room section will be housed in the bow smokestack section. The radar room will be housed in the stern smokestack. The CIC will be under the bridge in the hull section. The engine room will be under the stern smokestack. I figure I can have drop down doors on the hull like the original USS Destroyer toy for figure access to the hull sections and pull away wall sections to reveal access to the island structures areas. I figure I can make molds of the Flagg's control consols and use them in the appropiate sections (some modifications might be needed). I do believe I am ready to pick up some foam board and some hot glue sticks and start the next phase of the build and make a 3D model of the ship.

On a seperate note, my replacement stickers arrived earlier this week. I already applied the first set of the weapons transport on the yellow vehicle. I did notice I will need to do some additional paint apps to the white version so by painting in grey shapes for the white stickers to pop on the vehicle. A trick we used to do on Army vehicles to display vehicle ID info on the bumpers.

I will see about getting some more pictures up tonight. Until then, stay tuned for more updates.
 
Last edited:

Jedi_Master_Ben

Enlisted
Mar 6, 2012
49
3
8
51
Hey everyone,

This little update is just a follow-up to the earlier posting but with pictures.

The first picture shows the finial mock up of the destroyer after cutting and shifting things around. I included some more figures and props to show were play areas will be on the ship. Also, I included the barrel for the CIWS and placed it were the CIWS would be on the ship. The missiles are placed where they would be once the missile boxes are made. I got the foam board and already started cutting up the pieces for the 3D mock up. Here is the picture:


Next is the yellow weapons transport now with stickers. I still need to paint it up like the rims and the accents touches. Here is the picture:


That's it for tonight, until next time, stay tuned for more updates.
 

Attachments

  • USS Destroyer mock up 003.jpg
    USS Destroyer mock up 003.jpg
    62.1 KB · Views: 139
  • USS Flagg Tow Vehicle Sticker.jpg
    USS Flagg Tow Vehicle Sticker.jpg
    73.6 KB · Views: 136
Last edited:

G.I.*EDDIE

gobbles a LOT of cock
Founder
Mar 14, 2011
43,432
428
83
S.E. Mich :(
Yay!...pictures!...now you have my attention :D

I think I'm more interested to see how the scratch build destroyer turns out more than anything else...
 

daremo

Officer III
Sep 12, 2011
1,064
2
0
Phenomenal work throughout!!! I'm really looking forward to seeing the end product.
 

Jedi_Master_Ben

Enlisted
Mar 6, 2012
49
3
8
51
Hello everyone, hope you all are having a great weekend.

I have an update for you all on the USS Destroyer redesign project.


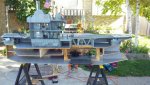
I have spent the last few days feverishly putting together a mock up of my design using foam board. I figure I am over 50% there with her. I got down the basic shape so far and I am liking how this is turning out. Keep in mind, this is no way representing any true scale to the real deal. Just a simple playset/ vehicle for action figures. Now that I got that out of the way, on with the pictures that you all love so much.

First picture is the overview of the ship:


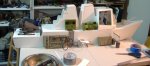
Next is the bow section. I had to split the shots for close ups.


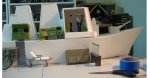
Last is the stern section of the boat.


OK, lets talk about the bridge. There is plenty of space for instruments and figures. I figure I can make a mold of the Flagg's controls and cut them to fit in the bridge area. A few other items will need to be custom built like the helm station. Behind the bridge is the first smoke stack/ radio room. Just like the bridge, I will open this area up to place the radio station (will need to cast and cut to fit). Next is the stern smoke stack/ radar room. Again a mold and cast of the radar control from the Flagg will go in there. Of course, at the stern is the landing pad. As you can see, the Sky Hawk fits nice and snug with a little walk way on either side. I would think some of the Chap Mei helicopters could land on it as well as the locus. Below deck, I was thinking of making 3 spaces between the two missile areas. One being the CIC, next a Sick Bay, and last an engineering room. The spacing in the photo is not right as the engineering piece is extended into the missile area. Worse case is that I drop the sick bay play feature. I will know more as I move forward.

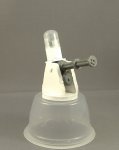
I got the CIWS built for the most part, however I am having a problem with the radar dome piece. I was going to use the NAV caps from the Flagg, but they are too small. Any ideas that looks like it, I even considered a R2-D2 figure body for the job.

I have an idea for the mid ship area. I was thinking the crane from the Tactical Battle Platform to represent the crane that lowers the rafts. And speaking of rafts, I was thinking of using the Chap Mei single seat rafts that comes part of a vehicle playset like the helicopter or the submarine. Should be small enough to fit on the side of the ship and the crane can put them in the water.

Anyways, just wanted to get these pictures out there and put down some of my thoughts. I still need to figure out how or what I am going to use to make the mast. Thanks again for the comments and for the cheer squad, stay tuned for more updates.
 

Attachments

  • USS Destroyer mock up 6.jpg
    USS Destroyer mock up 6.jpg
    70.1 KB · Views: 165
  • USS Destroyer mock up 4.jpg
    USS Destroyer mock up 4.jpg
    68.3 KB · Views: 162
  • USS Destroyer mock up 5.jpg
    USS Destroyer mock up 5.jpg
    84.6 KB · Views: 161
Last edited:

G.I.*EDDIE

gobbles a LOT of cock
Founder
Mar 14, 2011
43,432
428
83
S.E. Mich :(
I think there's a chap Mei vehicle that has a dish on it...though I'm not sure what size you're looking for...also, isn't there one on a BF2000 vehicle?
 

Meddatron

I am what I am
Apr 19, 2011
11,383
5
0
49
York, Pa
s1193.photobucket.com
How bout one of those plastic bubble things that hold toys that come out of the bubblegum like machines for the Radar Bubble. Another thought could be one half of those plastic balls that pop apart to put catnip in for cats. The one we have only has holes on the one half and its about the size of a baseball. Maybe a little smaller. Or even a Hamster ball.
 
Last edited:

Jedi_Master_Ben

Enlisted
Mar 6, 2012
49
3
8
51
I think there's a chap Mei vehicle that has a dish on it...though I'm not sure what size you're looking for...also, isn't there one on a BF2000 vehicle?

How bout one of those plastic bubble things that hold toys that come out of the bubblegum like machines for the Radar Bubble. Another thought could be one half of those plastic balls that pop apart to put catnip in for cats. The one we have only has holes on the one half and its about the size of a baseball. Maybe a little smaller. Or even a Hamster ball.

Thanks guys, but what I was referring to was the NAV caps that go the two NAV on the mast. Those were too small for the CIWS. I found an alternative, the plastic tubes covers for Krazy glue or lipstick cap. It won't be perfect dome shape, but then again, what GI Joe vehicle is completely accurate.
 

Jedi_Master_Ben

Enlisted
Mar 6, 2012
49
3
8
51
Hey JMB, how many hours have you clocked in so far?

I can tell you right now, it was not continuous. I started the project last year by purchasing pieces of the USS Flagg and the USS Destroyer and USS Tiger Shark. Before December, I had sculpted, molded and casted the deck crew figure kit and the salior variation (enlisted and officer). Went to California over the holidays and then got sucked into a movie Transformers project with the purchase of 1:18th(ish) scale Movie Optimus Prime from China which lead me to purchase 2 others that were close to that scale (Iron Hide and Megatron). As far as customs went, I worked with 3D Shapeways TF part maker to get articulated hands for Prime and a Transformers Prime/ Fall of Cybertron Cliffjumper head. That head was then resculpted by me to be made over to a Movie-verse style Cliffjumper base on my designs. The head was then put on a Battle Ops Bumblebee and repainted in Cliffjumper colors.

After that project was done, I got back to the carrier fleet project. In additon to that, I started to freelance sculpting for The Angel Forge. I just wrapped up some new heads, hats and a armored dog for the store.

If I would have go give a number, I would say over 200 man hours so far has been put into this. There is so much going on with this project, can stop one thing and move on to something else so I don't get burned out on just one aspect of the project. A little bit of sculpting one day, applying stickers the next, maybe some painting the following day, make a mold or two, something different each day or so.
 

Jedi_Master_Ben

Enlisted
Mar 6, 2012
49
3
8
51
HA!!!

My daughter provided me with the exact shape and diameter dome cap for the CIWS! Of all things, it from a lip balm cap, go figure. It was shorter than what I would of liked, but I was able to splice it with the super glue tube cap and trim to fit. I should have a pic of the moc up tonight. After that, I should be able to building the final version and prep it for molding and casting.
 

Jedi_Master_Ben

Enlisted
Mar 6, 2012
49
3
8
51
Hey everyone,

Not much of an update, just wanted to post the picture of the mock up of the CIWS I made.


Attachments

  • WIP CIWS.jpg
    WIP CIWS.jpg
    84.9 KB · Views: 187
Last edited:

Jedi_Master_Ben

Enlisted
Mar 6, 2012
49
3
8
51
hey guys,

I need your opinion on something. I in the middle of painting my Tonka Sea Knight and was getting ready to order some stickers from Cobrastickers.com and came to a dilemma, Do I order Low Visibility or do I order standard color?

If I go color, I have extra stickers from a Skystriker that I am not going to use because I want to order the Jolly Rogers set. The only thing I would need to order would be Skystriker XP-21F 30th Anniversary Number Sheet (Black) so I can get the NAVY, USS Flagg name, and numbers. Otherwise, if I go Low Visibility, I would need to order the Skystriker XP-21F 30th Anniversary "Low Visibility" (3 Sheets). I might also have to order the Skystriker XP-21F 30th Anniversary Numbers (Low Visibility) just to get the extra numbers. If none of my other aircraft are Low Visibility, would it be better to keep it non low visibility?
 

Monkeywrench

00coathanger
Mar 14, 2011
25,764
10
0
hey guys,

I need your opinion on something. I in the middle of painting my Tonka Sea Knight and was getting ready to order some stickers from Cobrastickers.com and came to a dilemma, Do I order Low Visibility or do I order standard color?

If I go color, I have extra stickers from a Skystriker that I am not going to use because I want to order the Jolly Rogers set. The only thing I would need to order would be Skystriker XP-21F 30th Anniversary Number Sheet (Black) so I can get the NAVY, USS Flagg name, and numbers. Otherwise, if I go Low Visibility, I would need to order the Skystriker XP-21F 30th Anniversary "Low Visibility" (3 Sheets). I might also have to order the Skystriker XP-21F 30th Anniversary Numbers (Low Visibility) just to get the extra numbers. If none of my other aircraft are Low Visibility, would it be better to keep it non low visibility?

I'm not sure which would look the best. You can ask the man himself:

http://forums.fighting118th.com/member.php?u=188
 

Meddatron

I am what I am
Apr 19, 2011
11,383
5
0
49
York, Pa
s1193.photobucket.com
I like continuity in things, to me, same fleet would mean same style. Only reason why I would want one to have a different style would be if it was meant to stand out for some purpose. If not. I say go uniform all around.