Vietnam era M113 with 106mm recoilless rifle

Vietvetson

Enlisted
Jul 9, 2013
105
14
18
San Bernardino, California
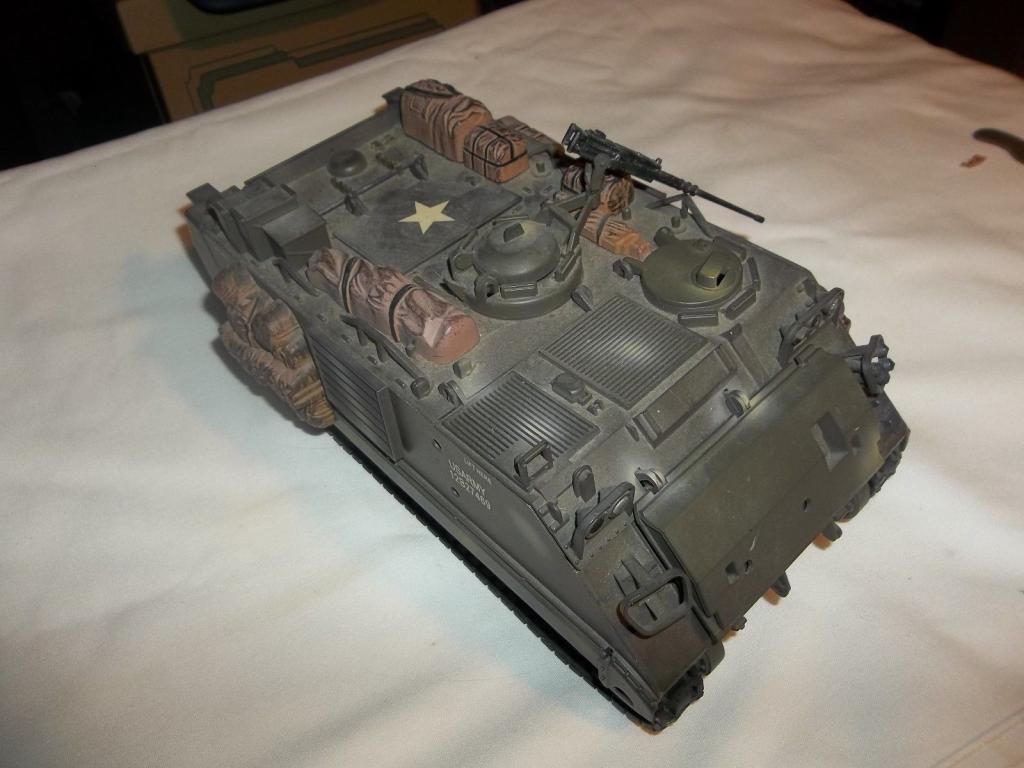
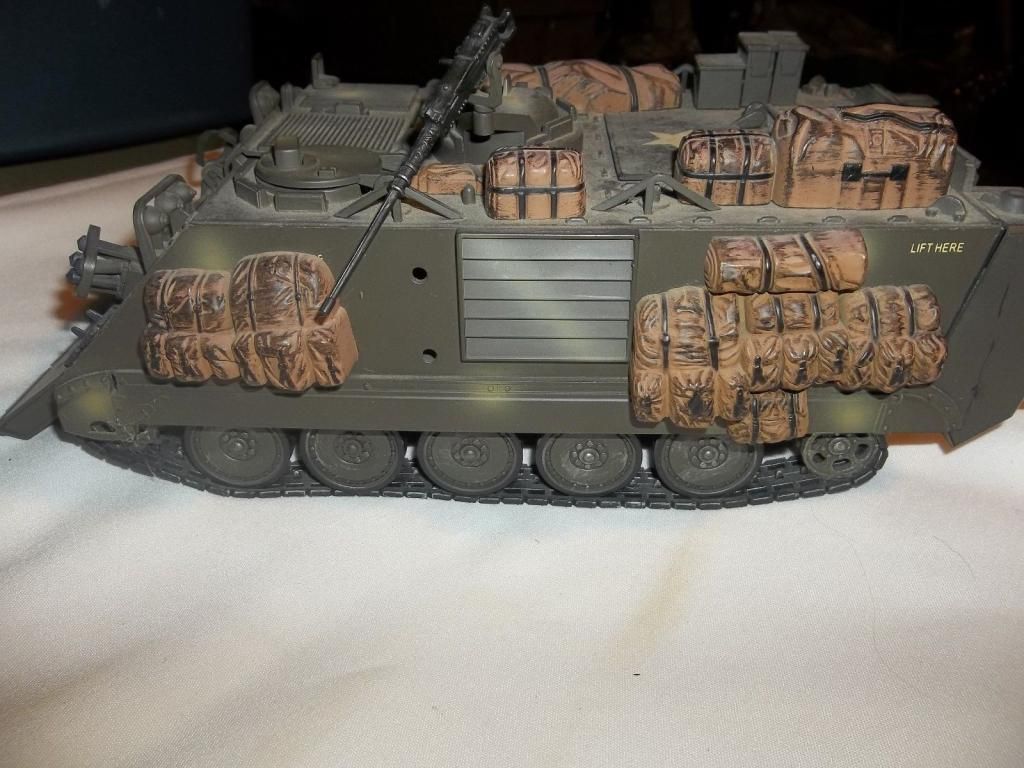
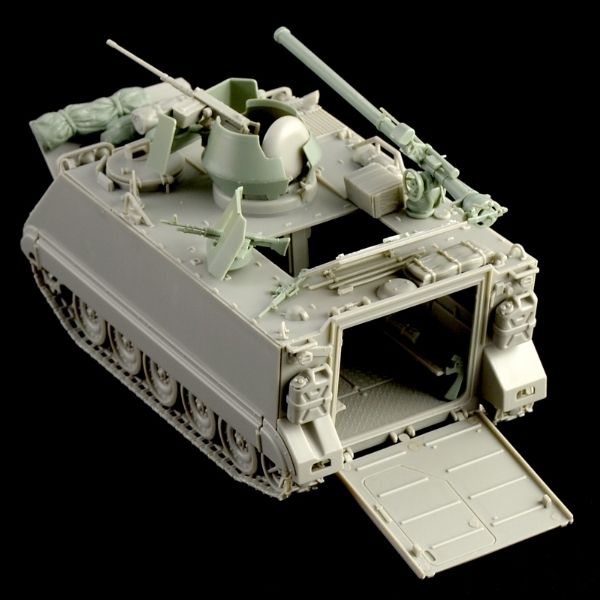
I was able to acquire a Millennium Models 1/18 M113A2 for a conversion to a Vietnam era M113 with 106mm recoilless rifle. Here is the model I started with and what my future conversion shall look like.


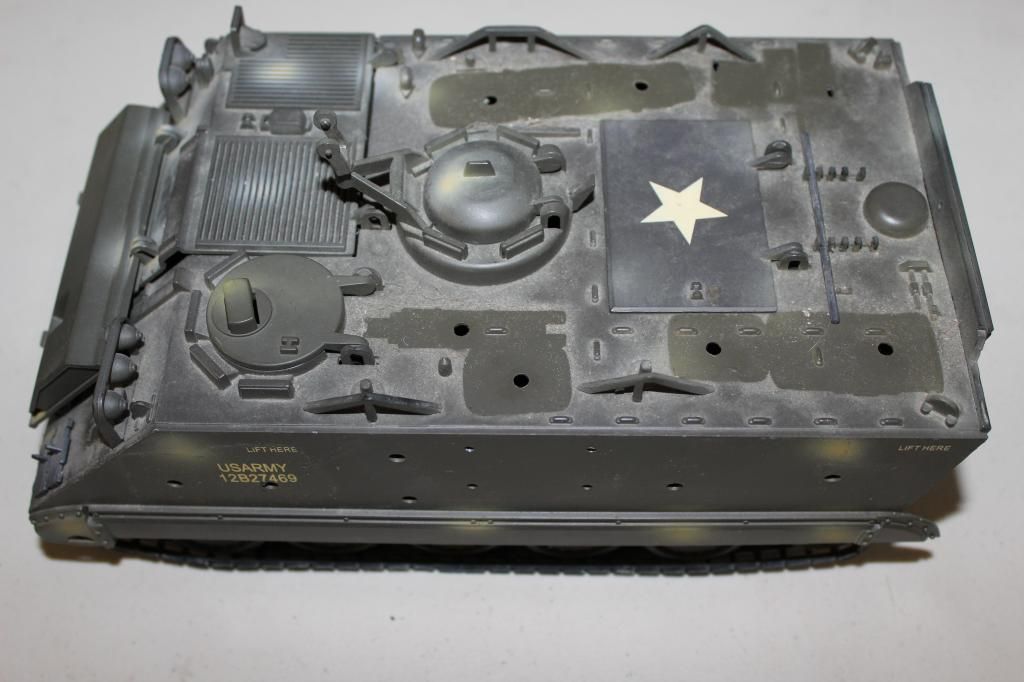
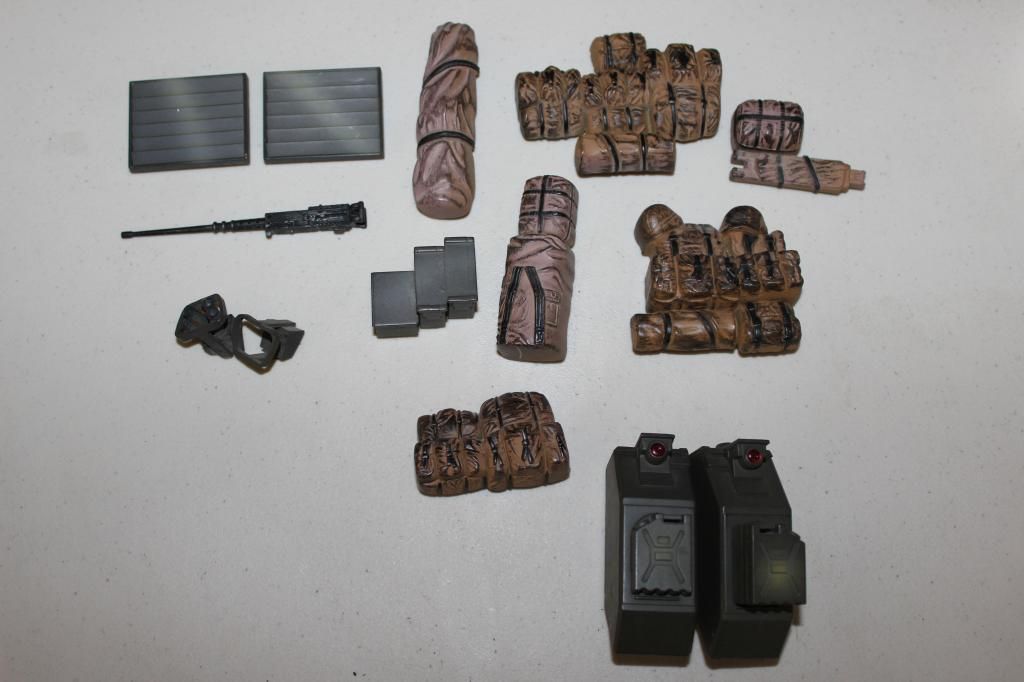
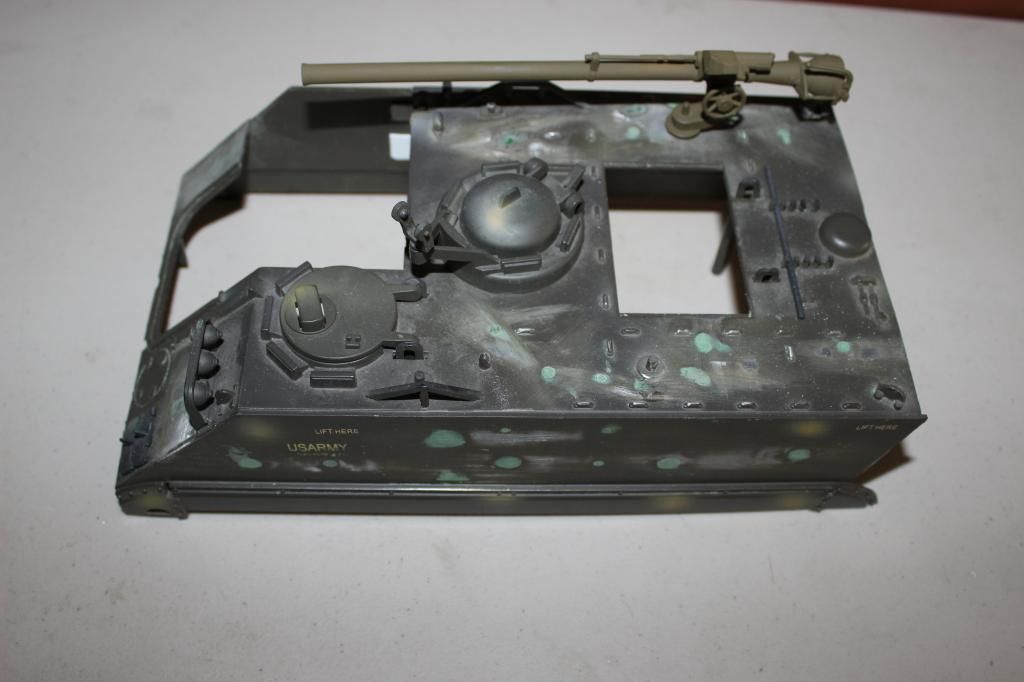
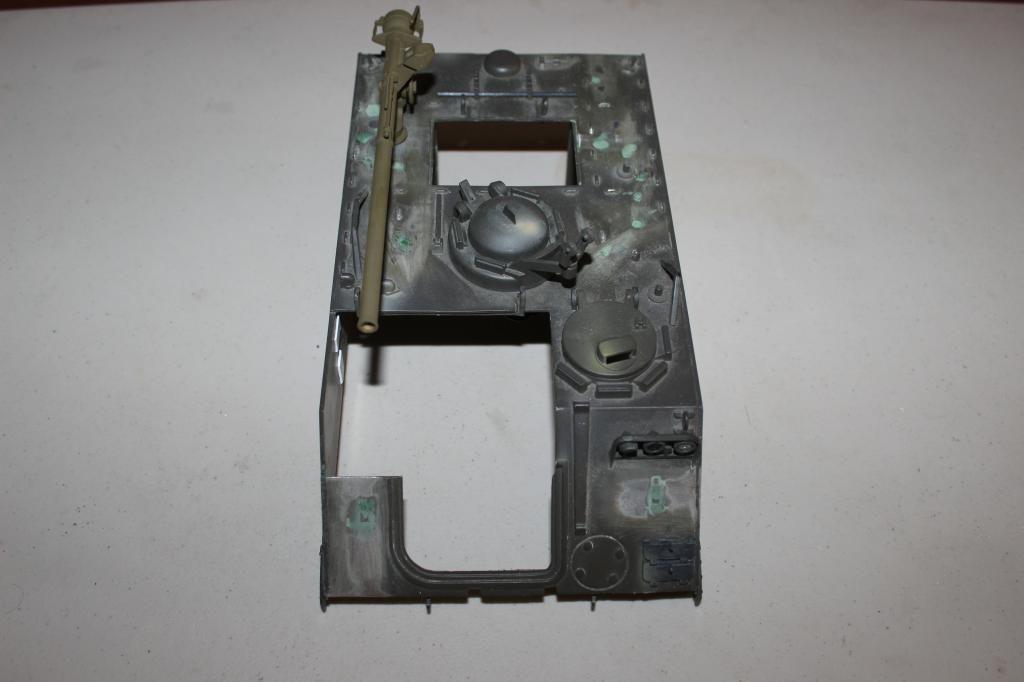
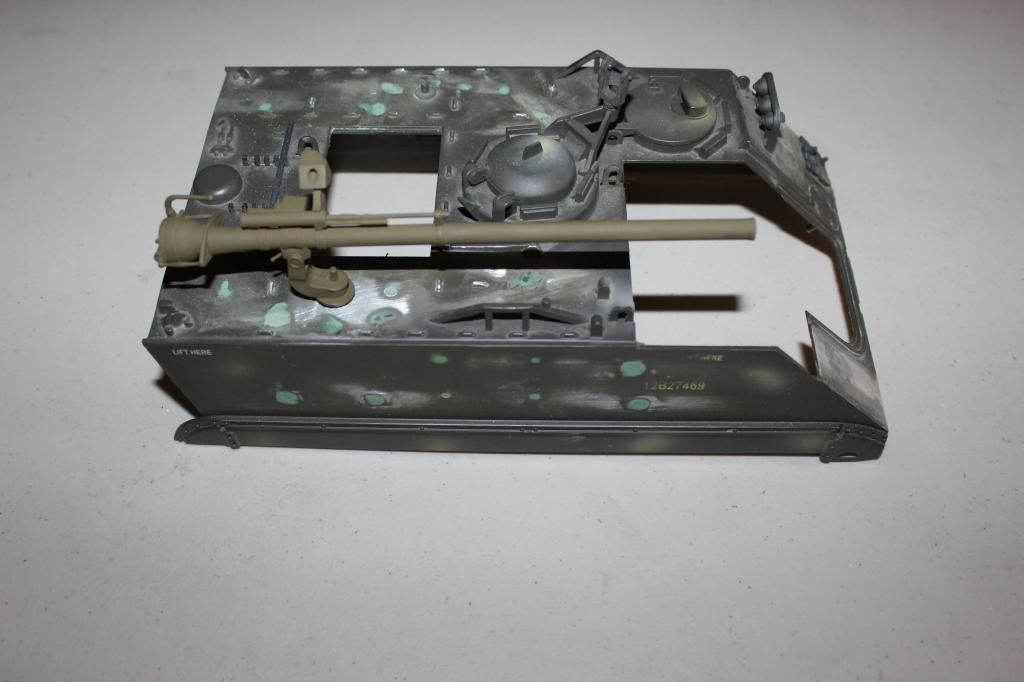
I removed all the storage accessories on the hull and filled the holes. I also drilled the hole to accept the 106mm.


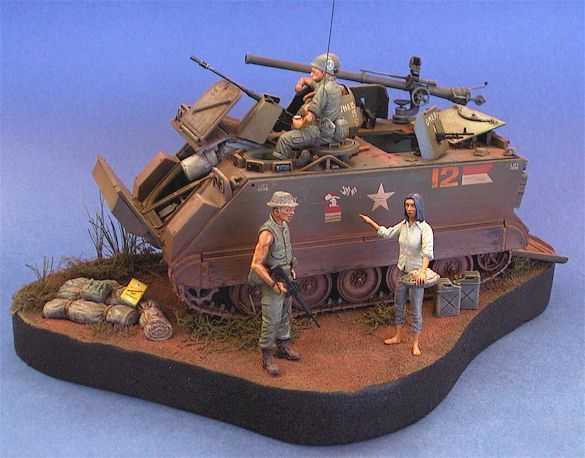
What I am planning on building.


More photos soon....
 
Last edited:
  • Like
Reactions: mutt71

Vietvetson

Enlisted
Jul 9, 2013
105
14
18
San Bernardino, California
I did notice something when I started. The hull number on the 1/18 scale model matched Tamiya's M113 model from the 1980's. My guess is the plan was to build the model as a Vietnam M113 at the start and they decided to upgrade it. The storage packs cover the numbers, so unless you remove them you would never see the numbers. Curious...


K-Tiger

All solutions are final.
Founder
Mar 14, 2011
31,266
190
63
Not even in the same ballpark. The Bbi one is Joescale garbage.
 

Vietvetson

Enlisted
Jul 9, 2013
105
14
18
San Bernardino, California
I used old gift cards (An idea I got from the guy who did the WWII Dragon Wagon) and plastic stock for some of the interior access hatches along with the driver and gunner's seats (not pictured). I wasn't going for 100% accuracy, just to the point where it satisfied me visually. Matt (Pickelhaube) once commented on detail work, essentially saying, "it's nice if you can see it". That thought stuck with me while doing this conversion.


  • Like
Reactions: mutt71

Apache26

Enlisted
Feb 3, 2013
208
2
0
Very cool. Modifying the Motorworks M-113 is a fun challenge. I look forward to seeing your work.
 
  • Like
Reactions: mutt71

Vietvetson

Enlisted
Jul 9, 2013
105
14
18
San Bernardino, California
I did not like the simple looking engine. My first thought was to remove the engine and replace it with a 1/18 scale Chrysler block from a diecast car. The engine was glued in very well and I feared I would break the flooring when I tried to remove it. I decided to detail the existing motor as best I could using the reference photos I found.

BEFORE


AFTER


There is a few other things I want to do to the motor before I primer the interior and engine compartment in preparation for painting.
 
  • Like
Reactions: mutt71

K-Tiger

All solutions are final.
Founder
Mar 14, 2011
31,266
190
63
Yeah, all those bbi vehicles from that recent run at Target are total shite. The little motorcycle that comes with the hind is ok.

That's because the Ranger Bike was a proper vehicle at one point.
 

Vietvetson

Enlisted
Jul 9, 2013
105
14
18
San Bernardino, California
It has been slow go this weekend due to a family emergency. I did have an opportunity to add two shelves to the interior hull for radio equipment, along with moving the fuel cap and backdating the exhaust. I also had a chance to work on the rear fenders and fix a couple of small details. I will post photos in the next day or two.
 

saltymarine

Enlisted
Aug 22, 2011
270
23
18
Awesome, I have the tan RC one, was contemplating doing an Iraq version with Bar armor, but it sits on a shelfe in waiting, and it does not have the numbers on the sides, at least mine doesn't .
 

Vietvetson

Enlisted
Jul 9, 2013
105
14
18
San Bernardino, California
Here is the photos of the relocated fuel cap and the backdated exhaust.

The fuel cap is located on the upper left rear portion of the hull.


The exhaust (silver piece) is located on the upper right front portion of the hull on the engine access.

 
  • Like
Reactions: mutt71

Vietvetson

Enlisted
Jul 9, 2013
105
14
18
San Bernardino, California
I painted the interior a Tamiya greenish grey. This is the closest color match I could find to the seafoam green.


I painted the engine based on some of the reference photos I had.


I painted up the seats I made, along with the fire extinguisher and the heater. I detailed the instrument panel.


I test fit the parts. I still have more touch up to do before I can do apply the decals and install the parts. It's coming together.


Enjoy...
 
Last edited:

Vietvetson

Enlisted
Jul 9, 2013
105
14
18
San Bernardino, California
I was able to complete most of the interior plaques and plumed the heater.


I then glued in the driver's seat assembly, drive handles, instrument panel, fire extinguisher and I installed the cargo compartments rear facing seat and box below the commander's seat.


In the interior of the hull I installed the shelves, painted the interior, put the decals on the forward hull and installed the radio equipment I scavenged from a derelict Vietnam Mutt. I also added a couple ammo boxes on one of the shelves.


My plan is to put some cargo in the bay area and button up the hull so I can primer and paint it. I figure I am 80% done.
 
Last edited:
  • Like
Reactions: mutt71

Vietvetson

Enlisted
Jul 9, 2013
105
14
18
San Bernardino, California
I put the cushions on both sides of the cargo bay along with three 106mm crates, seven more ammo cans and a ration box on the storage shelves.


I took a photo through the back of the M113 to give an idea of what it will look like when it's all buttoned up.


The next update should show the painting of the hull prior to assembly.
 
  • Like
Reactions: mutt71

Vietvetson

Enlisted
Jul 9, 2013
105
14
18
San Bernardino, California
UPDATE #10 I primed the exterior hull. I will touch up some areas before I put the first coat of paint on.


I went ahead and glued in the cargo for the interior.


I put the hull on and photographed how it would look inside the hull assembled.


Next I will paint the first coat of the exterior paint and start making the fenders for the rear of the APC.
 
  • Like
Reactions: mutt71

Vietvetson

Enlisted
Jul 9, 2013
105
14
18
San Bernardino, California
I painted the hull with Testors Dark Olive Drab #1610. I attached the 106mm recoilless rifle to the hull and installed the hull to the chassis.


I took a photo of the engine compartment with the hull assembled. I'm actually thinking about making the radiator and air cleaner for the engine compartment (#6-9 in the last picture).


My next update I will show the fenders and some of the parts for the rear of the APC prior to primer and painting.
 
Last edited:
  • Like
Reactions: mutt71

Apache26

Enlisted
Feb 3, 2013
208
2
0
That looks great!

A couple things:

1. MRE's? I have properly scaled C-Rations if you want a couple.
2. Dark OD 24087 can be a hard color to place, and it doesn't help that vehicles of that era had differing shades of 24087 depending on which contractor made the paint. It may be the light, but the Testor's OD looks way too light.
 

Vietvetson

Enlisted
Jul 9, 2013
105
14
18
San Bernardino, California
I appreciate the offer for the MRE's and may take you are right on about the lighting, my M113 is actually darker than the picture shows. The flash from my camera gives it a lighter look and makes it appear more of the WWII olive drab. I tried three or four different shades before I ended up settling for this one. No one could give me a definitive answer as to the proper color since a number of shades of green were used like you had said. You add to the fact that the Marine Corp. used a darker color green for their armor it just created more confusion. I will take a picture without the flash to give you a better idea of the color for my next photo. Thanks for the information.
 
  • Like
Reactions: mutt71

Apache26

Enlisted
Feb 3, 2013
208
2
0
KT - I can count rivets too.

Vietvetson - I have friends who restore Vietnam era vehicles. In an effort to repaint some items of equipment, ammo and gas cans, as well as paint models, I did some research on the paint. Like all things military, there are people out there who know the government catalogue numbers and can tell you when designations changed, etc. Dark OD Semi-Gloss shade #24087 is the correct color, and there are plenty of places where you can get it in bulk paint cans or in rattle cans. I've only found one company that produces it in a shade that exactly matches what is on my original rucksack frames and ammo cans. Others come close enough for my purposes, but the color can also depend on what primer is used, etc. Photos of tanks, jeeps and APC's from that era make the OD almost look black. But at other times, depending on the light, it has a mellow OD. Making sure it is a semi-gloss is very important. When I paint 1:18 ammo cans, I use Tamiya's dark OD (XF-62). By itself, it isn't any good. But when combined with a semi-gloss, it takes on the best approximation of OD 24087 that I can find out of a hobby acrylic paint from a bottle.
 
  • Like
Reactions: mutt71

Apache26

Enlisted
Feb 3, 2013
208
2
0
Very cool. Let me know if or when you need the C-Rations. PM me with your address.

With the paint it can get very confusing. I didn't go into too much detail on my research; for example military 24087 was changed in the late 1980's, so there is a difference in the current military 24087. Modern military contract paint catalogues designate the Vietnam era dark OD semi-gloss differently than the modern 24087. But neither color is even used to any great extent now. There is also some confusion about how the paint was designated in the 1950's when it came into use.

I can also send you resources for spray cans of the Vietnam era 24087.
 
Last edited:

Vietvetson

Enlisted
Jul 9, 2013
105
14
18
San Bernardino, California
Very cool. Let me know if or when you need the C-Rations. PM me with your address.

With the paint it can get very confusing. I didn't go into too much detail on my research; for example military 24087 was changed in the late 1980's, so there is a difference in the current military 24087. Modern military contract paint catalogues designate the Vietnam era dark OD semi-gloss differently than the modern 24087. But neither color is even used to any great extent now. There is also some confusion about how the paint was designated in the 1950's when it came into use.

I can also send you resources for spray cans of the Vietnam era 24087.

I will PM you with the information.
 

Vietvetson

Enlisted
Jul 9, 2013
105
14
18
San Bernardino, California
I worked on the equipment for the rear of my Vietnam M113 to match what I am seeing in some of my reference photos. I plan on trying a different color for the overall tank based on feedback I have received from other members.


I can see the finish line. Thanks for all the input.
 
  • Like
Reactions: mutt71

Vietvetson

Enlisted
Jul 9, 2013
105
14
18
San Bernardino, California
Very cool. Let me know if or when you need the C-Rations. PM me with your address.

With the paint it can get very confusing. I didn't go into too much detail on my research; for example military 24087 was changed in the late 1980's, so there is a difference in the current military 24087. Modern military contract paint catalogues designate the Vietnam era dark OD semi-gloss differently than the modern 24087. But neither color is even used to any great extent now. There is also some confusion about how the paint was designated in the 1950's when it came into use.

I can also send you resources for spray cans of the Vietnam era 24087.

I tried the color and it looks like it will work once I put the semi-gloss on. I will post photos in the next day or two. Thanks for the information, these forums really pay off.
 
Last edited:
  • Like
Reactions: mutt71

Vietvetson

Enlisted
Jul 9, 2013
105
14
18
San Bernardino, California
I repainted the M113 using the suggestions made by members in order to properly mimic the Vietnam color I was hoping for.


Thanks to the help of Pickelhaube's M113 conversion parts I was able to obtain the bell turret, .50 cal shield and the M60 shield needed for my conversion.


I puttied the holes left from the mold process before I primed the pieces.


The next photos should be of the assembled model.
 
Last edited:
  • Like
Reactions: mutt71

K-Tiger

All solutions are final.
Founder
Mar 14, 2011
31,266
190
63
Sure is. I'd like to see the flash cone on the M2, but I seem to be the only one that likes them.
 

Apache26

Enlisted
Feb 3, 2013
208
2
0
Sure is. I'd like to see the flash cone on the M2, but I seem to be the only one that likes them.

I dig them too!

Man, PH sent you the turret and shield? He wasn't so forthcoming with me...

That's ok, as I wasn't looking to do an FMC converted ACAV but a mech troop carrier which commonly used a different style turret.

The new paint job looks great! I can't wait to see the recoilless mounted on there.
 

Vietvetson

Enlisted
Jul 9, 2013
105
14
18
San Bernardino, California
The rifle was installed when the hull was mounted to the chassis. It blends in because of the color. I think the next photos with the installed shields will make it more apparent. Thanks for looking at the photos. I will also look into making a cone for the M2.
 
  • Like
Reactions: mutt71